Wednesday, July 9, 2014

Backbreaking, Beautiful Flooring Days

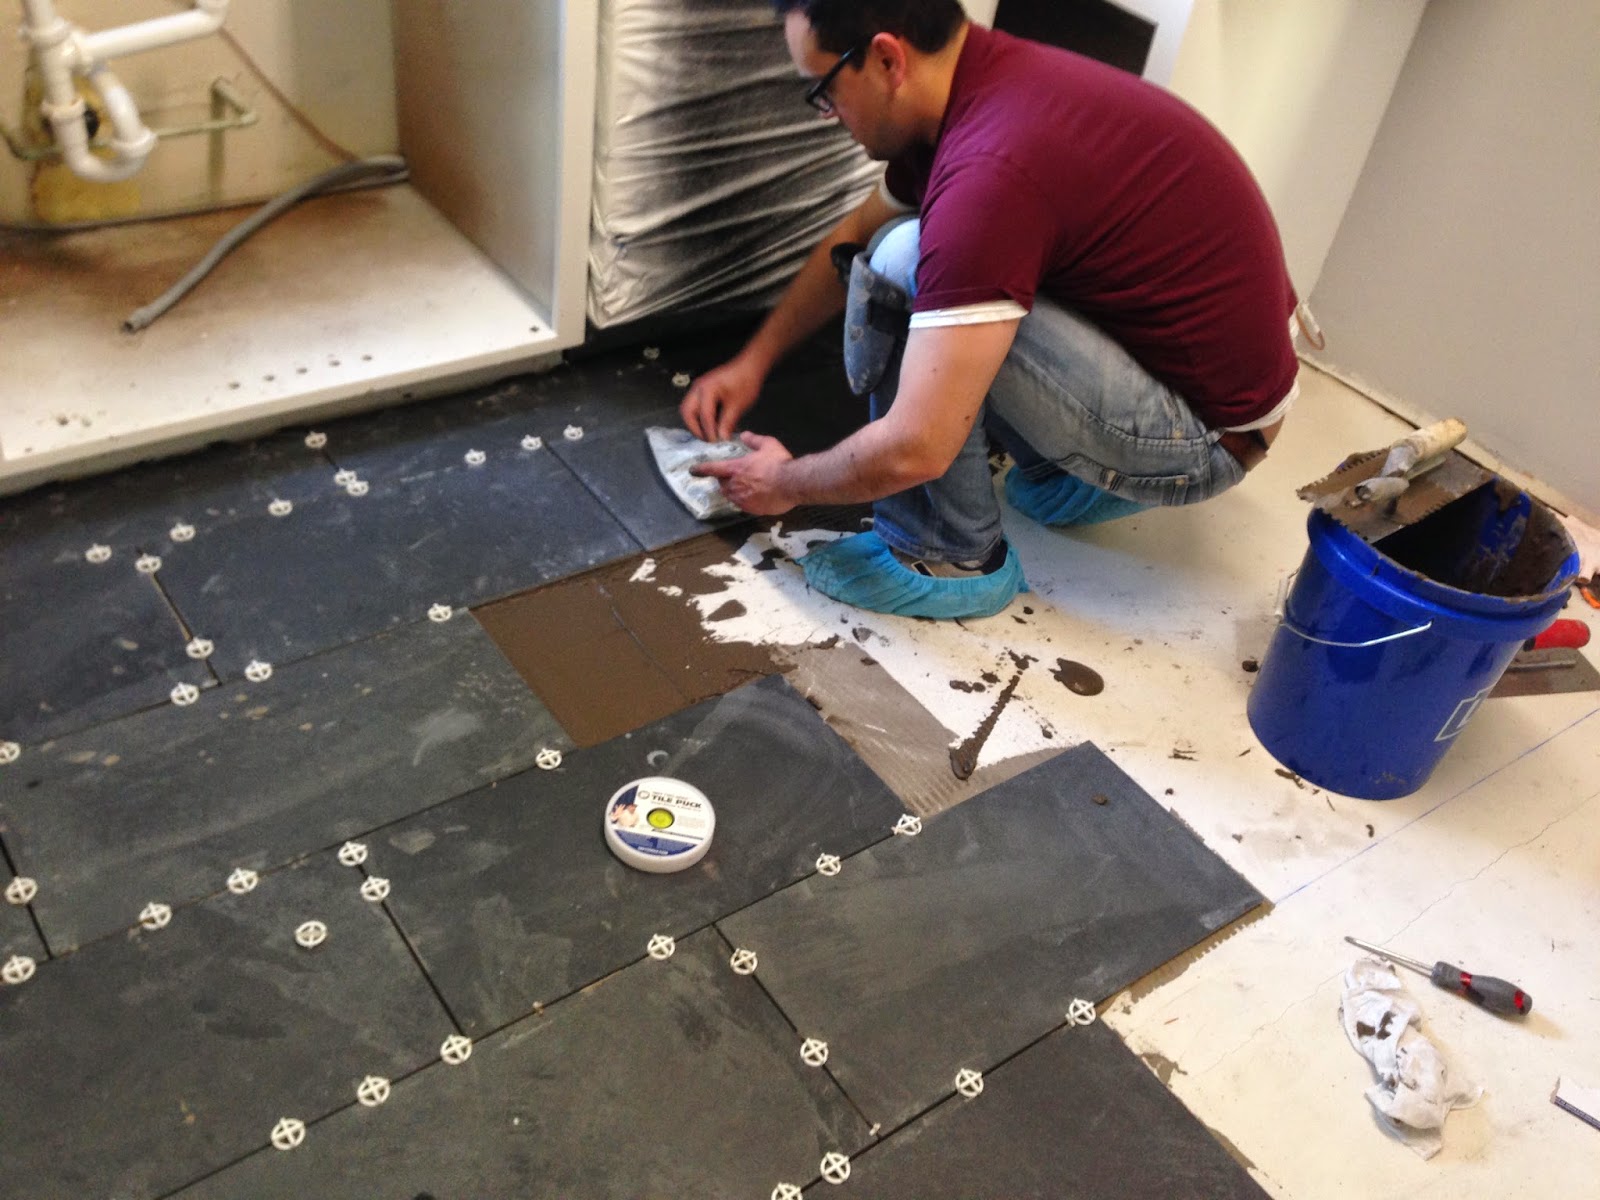
Everything is so much easier when you're planning it. That entails pen and paper and the lovely, clean imagination. The real life process is a little sticky. Literally. The time for flooring had come. And I learned quickly that you can't just throw down a bunch of tile and call it a day. You have to have proper sub flooring with moisture barrier before you can lay a single tile. Im pretty sure that the subfloor under the linoleum was fine, but my husband likes to be thorough so we laid some special paper with a super sticky glue then covered the whole thing with a thin layer of thin set. 

 Ta dah! Its wonderful when three hours work yields such underwhelming results. 
 Finally the day when we lay the tile. The interesting part is you get to know your kitchen really well when you are installing tile. For example, we found that our walls are bowed. Made for some extra thick grout lines under the dishwasher and behind the refrigerator. 
 We installed black slate tile 12x24 inches. Each piece was a beast, but my new handy dandy tile saw cut through the slate like butter. Sadly there are no pictures of the tile saw in action. Jason laid the tile and I cut and my cell phone sat forgotten in my purse. 

Two pieces of tile from the same box. Slate is natural stone  so every tile was different. I like it now but this freaked me out on install day.  
 Before grout. 
And done. 

Countertops and Sink

So this was fun. Embarking on a task where you have nothing to guide you but youtube videos. Oh yeah, super fun....and scary as hell. We ordered one 12 foot cherry butcher block countertop and one six foot from lumber liquidators and had the happy task of cutting them ourselves. Since we are newbies at this whole power tool thing we decided to do straight cuts instead of 45 degree cuts for the corners. And I'm so glad we did. Jason cut three pieces before we had a huge "duh!" moment and clamped a guide so we could get our perfect cuts much faster. You live you learn. 


The trendy contractor :) 

pocket jig holes secured the countertops to each other then they were flipped and secured from underneath. 
notching the countertops to fit the farmhouse sink! 

And the sink. I am so glad this day is over. The countertops needed to be cut a little to get the sink in perfectly. Since the lip of the sink rests on the countertop it was pretty important we didn't cut too much....which meant Jason had to dead lift the sink about 20 times. 
Still not there...


And finished...sorta. Water isn't hooked up yet, but its in! I had a horrible dream the night we installed this...I walked in the house the next day and the sink had fallen down, shattered, and of course dragged the countertops with it, cracking the newly installed slate tile. However, the next morning everything was fine and my ridiculous paranoia was put to rest. 

Thursday, July 3, 2014

Cabinets

The cabinets took much longer than anticipated. Partly due to the process: deglossing, sanding, nailing, filling, sanding again, priming (both sides), sanding, priming, sanding, painting, sanding and then the final coat of paint. Yeah, not exaggerating. My sister told me no one would notice if I skipped a step or two, but I would know. Better to get it all done now. 
 Lots and lots of doors.
 And my favorite part of the entire renovation. The nail gun. Think about thirty nails went into that first cabinet. So fun. 

Getting there

Framed the doors one day, filled with wood filler and sanded another day. All thanks to Mema who came up for a few days to play with my kidos so mommy could work. :)  

 Painted the first layer of primer with a teeny tiny roller brush. It was tedious. Then, as I was painting with my mini roller my eyes fell to the unopened box of my new paint sprayer. Why not? I mean, the kitchen is mostly empty anyway. So we hung some plastic sheeting and the kitchen was primed and painted in two days. yay!

Can you see the haze?  

 Pretty grey paint! 

This is a perfect example of what not to do. Never lay anything you are going to paint on plastic sheeting. Paint sticks to the plastic so when you lift up your door you also pull up a thin layer of dried paint that surrounded the door. Extra sanding. Learned my lesson, but at this point I was feeling done with pictures...and my phone was covered with dust and paint. 

This was a spur of the moment thing. I was procrastinating on another task so I decided to be productive in my procrastination and paint the inside of my drawers and upper cabinets. Took a while, but makes everything look more complete. 

Close up of the new cabinets with hardware. More pics to come. :)

Tuesday, July 1, 2014

Starting

In the interest of moving things along….We moved, we moved again, now we live in a home we purchased in Washington state. Which is where the madness begins. Our house, while clean and mostly lovely (Seriously in love with my backyard), had a very 80s kitchen. Chipped laminate countertops, yellowed linoleum floor, crusty oven range and even nastier hood vent….of course it was all topped off
with a lovely drop ceiling…florescent lights and all. The good thing is, its small. So with a little careful planning and a lot of help from youtube, we figured we could knock out a newish kitchen in a month. Oh what a month it was, well months rather. For the entire month of May, and most of June I could always find various colors of paint somewhere on my body.

The first part of any kitchen renovation is demolition. I thought since we had decided to salvage the cabinets, it would be pretty easy. Oh, how naive I was. Anytime you decide to do anything on your own it will probably be hard. Or tedious. Or psychologically damaging in some way….or some combination of those things. And don’t believe Pinterest and all the pretty dust free pictures, any degree of renovation is hard work.
The before

Yeah, this just isn't going to work...
 The day after we closed on the house. So innocent and unaware...and apparently very excited about something located to the upper left of the camera. Haha
The dishwasher stayed, but the mammoth refrigerator the previous owners squeezed into this tiny kitchen didn't come with the house. A relief, because if it did I would probably be chucking dishes to the back of the dishwasher.
 All the cabinet doors came off first. The kitchen looks so much bigger without the big corner cabinet. 
Then the floors. And yes thats floors, with an s. plural. Two layers of linoleum flooring attached with lots of glue. 
This is when I started freaking out. Less than a week into our renovation and our kitchen looked like this. No countertops, no floor, no cabinet doors, no sink. Its really hard to see progress through the mess, but it had to be done. The good thing is we had our rental house during most of the madness, which was great because we could retreat back to a dust free zone with a functional kitchen. 


More to come.....